“FLASH” your radio with new features using the Customer
Programming Software (CPS).
“FLASHing” Procedure (CPS)
“FLASHing” or upgrading your radio requires the Customer
Programming Software (CPS) which is used during normal radio
programming and servicing procedures. Refer to the “Getting
Started” section for your radio’s specific CPS part number. The
following steps describe the best method to upgrade your radio.
Note: To save time, perform upgrades of the same model type
consecutively. (Example: XTS 5000 Model 1 radio followed
by an XTS 5000 Model 1 radio.)
1. Your FLASHport software upgrade package includes one
piece of software (FLASHport upgrade software) on CD-ROM.
Before starting the upgrade procedure, copy the software to
your PC hard drive.
2. Connect the equipment as shown on page 7 of this guide.
Make sure the radio is equipped with a charged battery
(portables) or an external power supply (mobiles).
3. Apply power to the radio. The radio should turn on and go
through its power-up sequence.
Note: Do not disconnect your radio until the FLASHport upgrade
process is completely finished.
4. Launch the CPS program by selecting:
Start → Programs → Motorola →
(Note that the items listed in italics between < > will vary
depending on the type of radio you are upgrading; make the
selections appropriate to the radio type (e.g., XTS 5000 radio,
XTS 2500 radio, etc.).
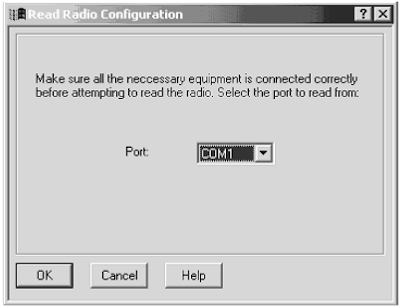
5. From the menu bar in the CPS main window, select:
Tools → FLASHport → Read Radio Configuration
The following Read Radio Configuration screen will appear. Make
sure the Port setting is correct and click on OK.

6. The following View Radio Configuration screen will appear.
Make a note of the FLASHcode and System Package fields
currently set for the radio. After the upgrade, you’ll re-examine
this screen to make sure the upgrade was successful. (Note
that you can click on the Details button to view the features
currently enabled on this radio.)
7. Close the View Radio Configuration screen. From the menu
bar in the CPS main window, select:
Tools → FLASHport → Read FlashKey Configuration
The following Read FLASHkey Configuration screen will
appear.
Be sure to read and heed the notice and warning on the
screen. Click on OK to proceed.
8. The FLASHkey Configuration will be read and the View
FLASHkey Configuration screen will appear.
More data is displayed if a full upgrade FLASHkey is read; less
data appears if a refresh FLASHkey is read.
9. From the menu bar in the CPS main window, select
Tools → FLASHport → Upgrade Radio
10. The Upgrade Radio screen will appear. Using the Browse
button at the end of the edit control, navigate to the location of
the new radio software file (copied to your PC in Step 1), verify
that the directory paths in the Current Settings area are correct
(typically valid unless you have moved files, in which case
you’ll have to select the proper paths), then click OK.
Note: Regarding the UCM Upgrade Path & Filename field, the
UCM (Universal Crypto Module) is used for radios equipped
with Secure Encryption. This field is only used if the radio
contains a UCM module and the module software will be
upgraded.
11. The FLASHing Radio... screen will appear. The new software
will begin loading into the radio, as indicated by a progress bar
at the bottom of the screen.
Note: For the XTL 5000 with O5 control head, XTL 2500 and XTL
1500 radios, the FLASHport process takes longer than other
mobile radios due to the fact that these new control heads
now contain upgradeable software.
12. When the software has completed loading into the radio, the
following screen will appear.
13. Repeat Step 5 to verify that the new software version appears
in the FLASHcode and System Package fields. You may also
click on the Details button to verify that any new features have
been enabled.
14. Once your radio has been successfully “FLASHed,” you are
free to use the CPS to enter any customer-specific information
normally contained within the CPS. After CPS programming is
complete, save the codeplug data to an archive file. You may
upgrade another radio by repeating Steps 5 through 12 (pages
9 through 13).
After completing the upgrade, disconnect the radio. Replace
and/or add the radio label with the new radio label provided. It is
very important that the new labels are placed on each
“FLASHed” radio so that the radios can be identified for future
service and programming.
To help identify the radios that have already been upgraded,
place an “I’ve been FLASHED” sticker on the outside of the radio.
These stickers can be easily removed by the end-user.
A FLASHcard should be given to the end-user with each radio
upgraded. This FLASHcard provides the end-user with a quick
reference of the new features that the radio now contains due to the
upgrade.